Backstage: Creating a Tenant
This guide provides a complete walkthrough of creating a new tenant within an existing business unit through the Backstage developer portal. Tenants represent individual workloads or applications within a business unit, each getting their own GCP project, GitHub repository, and Terraform configuration.
Prerequisites
Before creating a tenant, you must have:
- An existing business unit with a repository (e.g.,
bu-my-new-bu-16i2s). See Creating a Business Unit for how to create one. - GitHub authentication in Backstage (logged in via the sidebar)
Overview
Creating a tenant through Backstage follows this automated flow:
- Fill out a multi-step form in Backstage (3 steps)
- Backstage generates Terraform module configuration and creates a Pull Request
- Terraform Cloud runs a speculative plan to validate the configuration
- Approve and merge the PR
- Terraform Cloud applies the configuration
- GCP resources (project, service accounts, APIs) are created
Step 1: Navigate to Create Tenant
Go to Create... in the left sidebar, then select the Create Tenant template, or navigate directly to:
/create/templates/default/create-tenant
The template consists of 3 steps:
- Create Tenant -- Basic configuration
- Edit Module Configuration -- Fine-tune Terraform variables
- Review -- Verify and submit
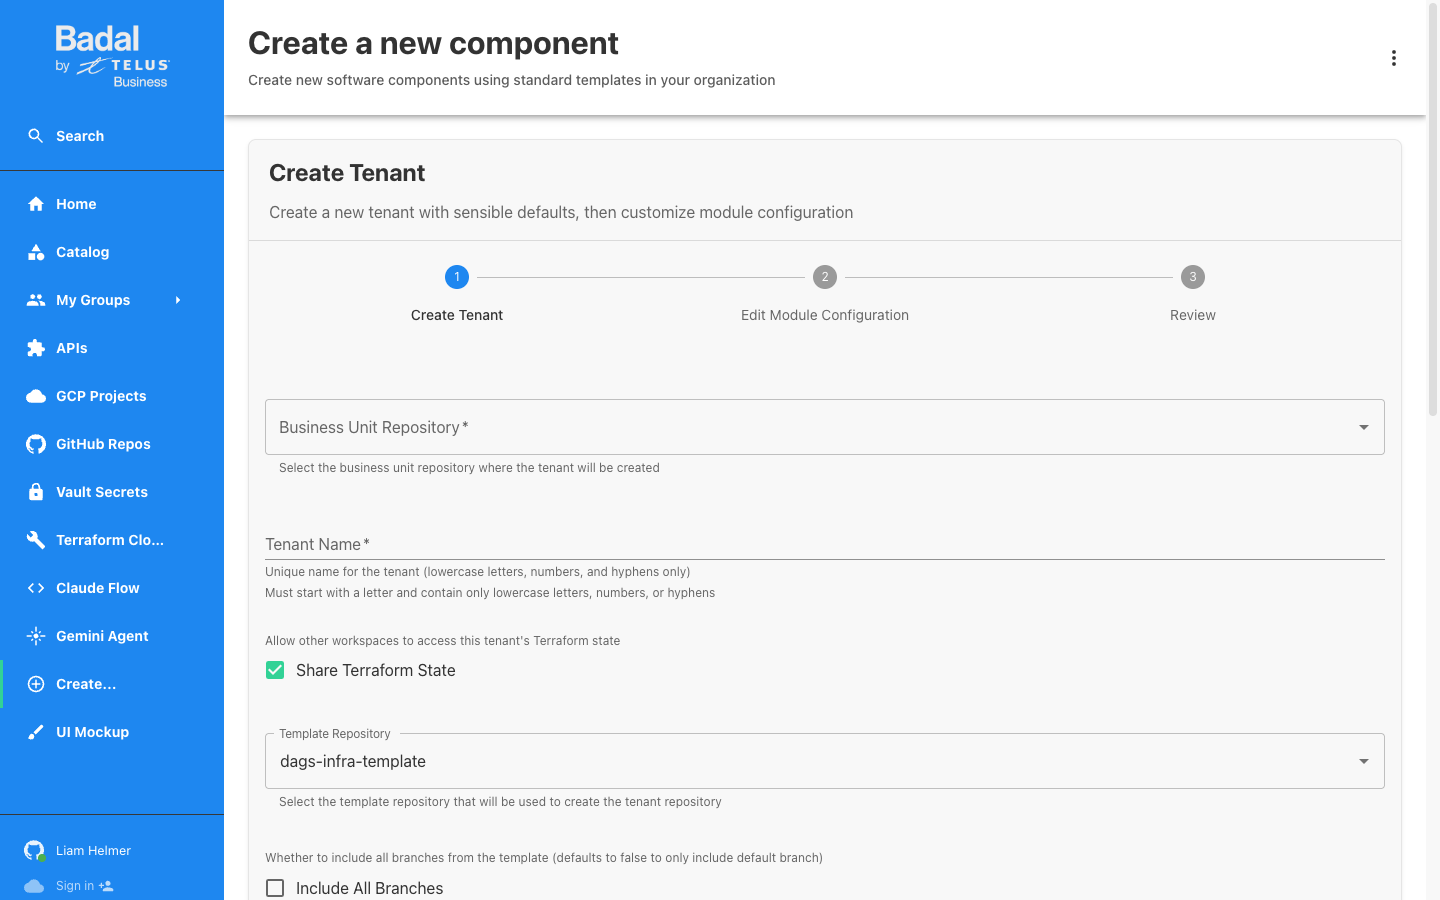
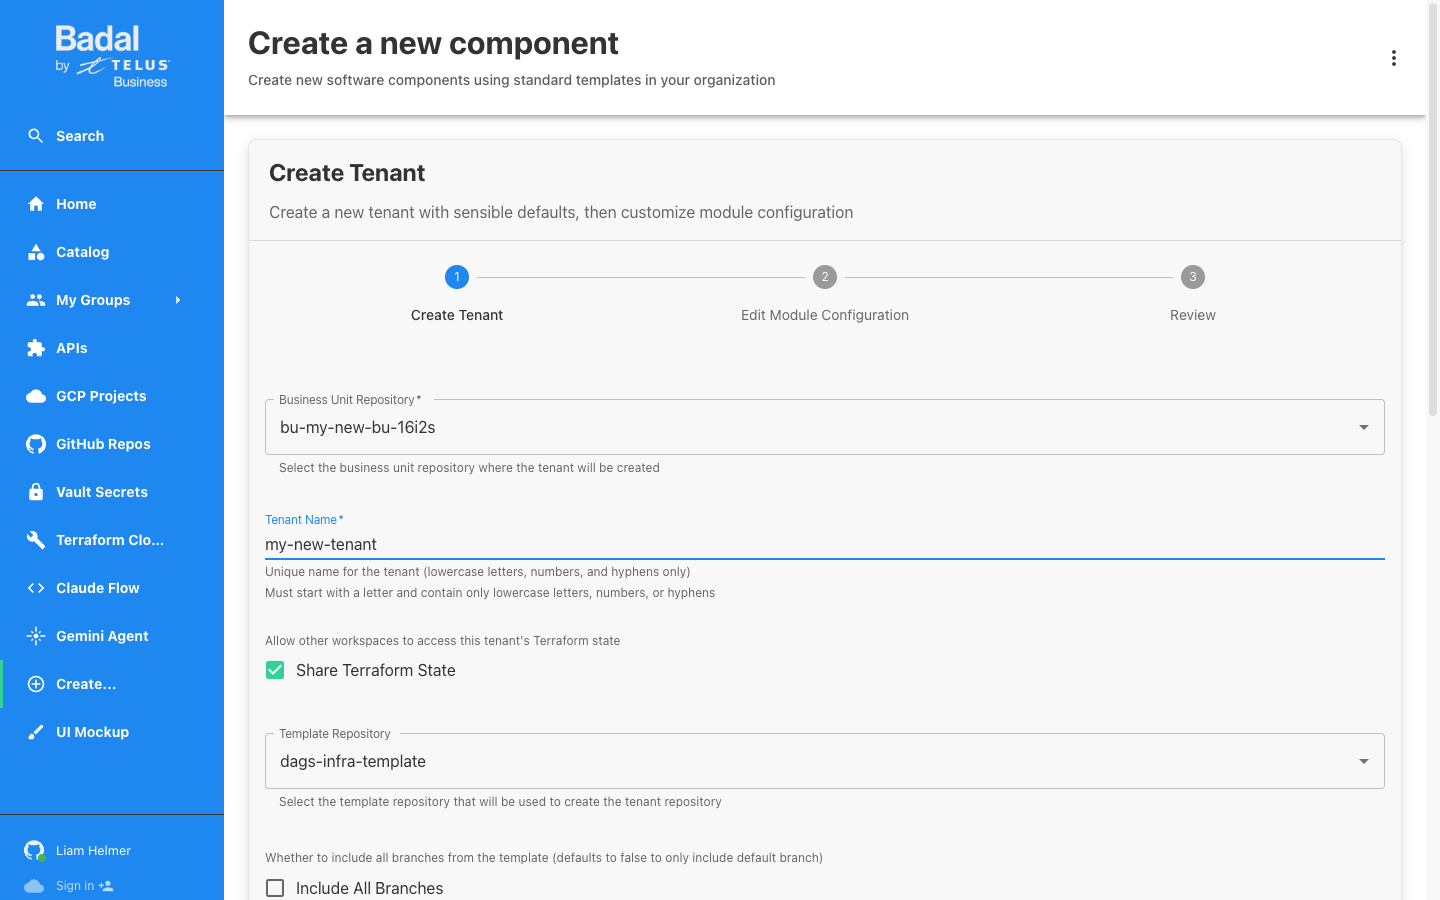
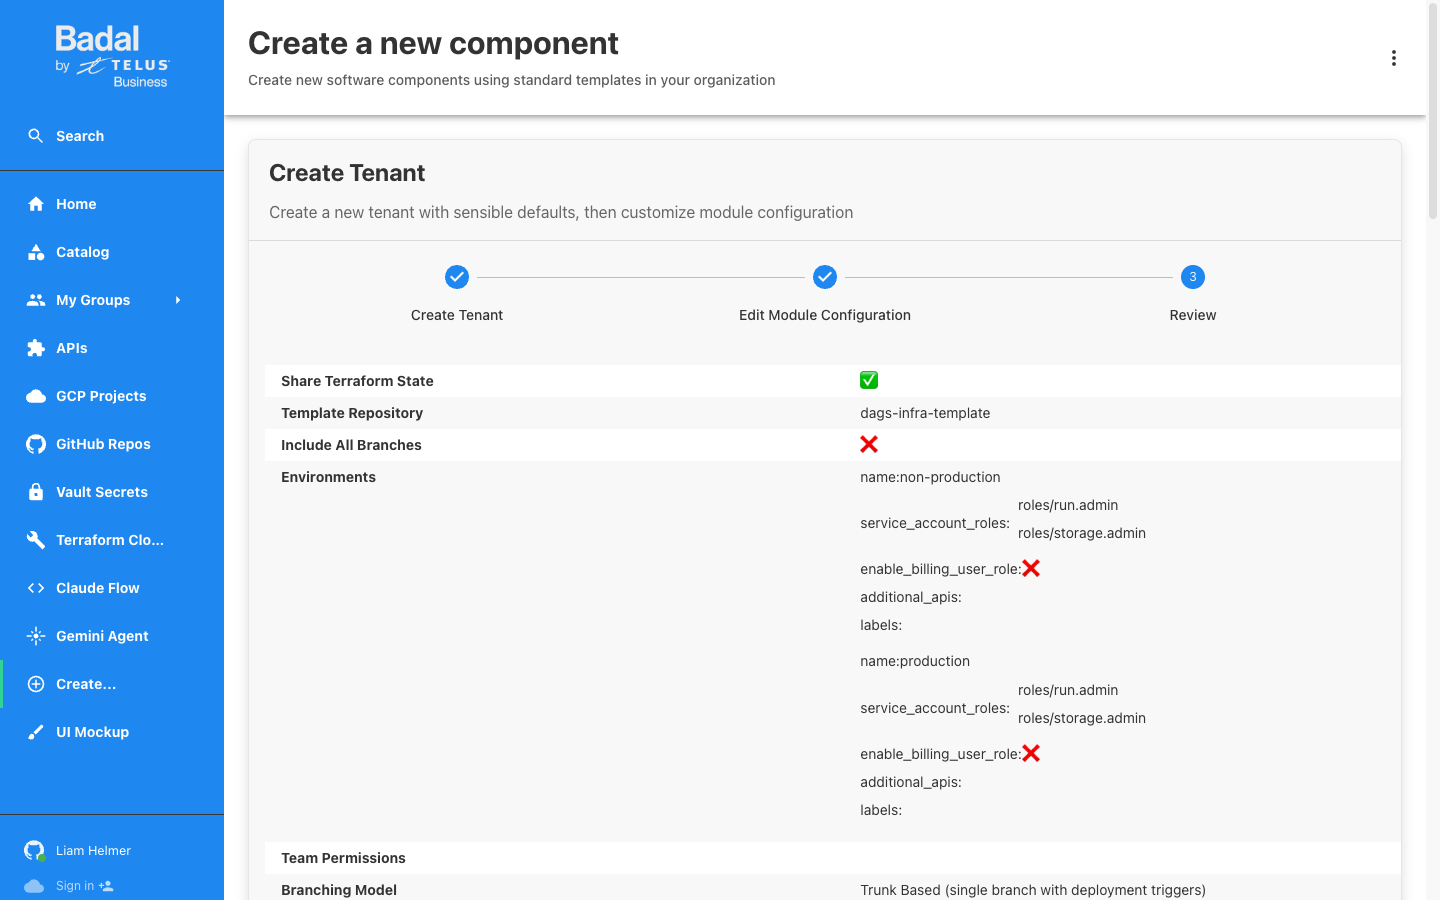
Step 2: Configure the Tenant
Business Unit Repository
Select the business unit repository where the tenant will be created. The dropdown lists all bu-* repositories in the organization.
Example: bu-my-new-bu-16i2s
Tenant Name
Enter a unique name for the tenant. The name must follow these rules:
- Must start with a letter
- Lowercase letters, numbers, and hyphens only
- No spaces, underscores, or special characters
Example: my-new-tenant
Additional Options
| Option | Default | Description |
|---|---|---|
| Share Terraform State | Checked | Allow other workspaces to access this tenant's Terraform state |
| Template Repository | dags-infra-template | Template used to scaffold the tenant repository |
| Include All Branches | Unchecked | Whether to copy all branches from the template (default: only the default branch) |
Environments
By default, two environments are configured:
- non-production
- production
You can add or remove environments using the Add Environment / Remove item buttons. Each environment name must match variables defined in the business unit repository.
Team Permissions
Optionally add GitHub teams with their permission levels for the new tenant repository. Teams can be added later if not configured now.
Branching Model
| Model | Description |
|---|---|
| Trunk Based (default) | Single branch with deployment triggers |
| Git Flow | Feature branches merged to develop, then to main |
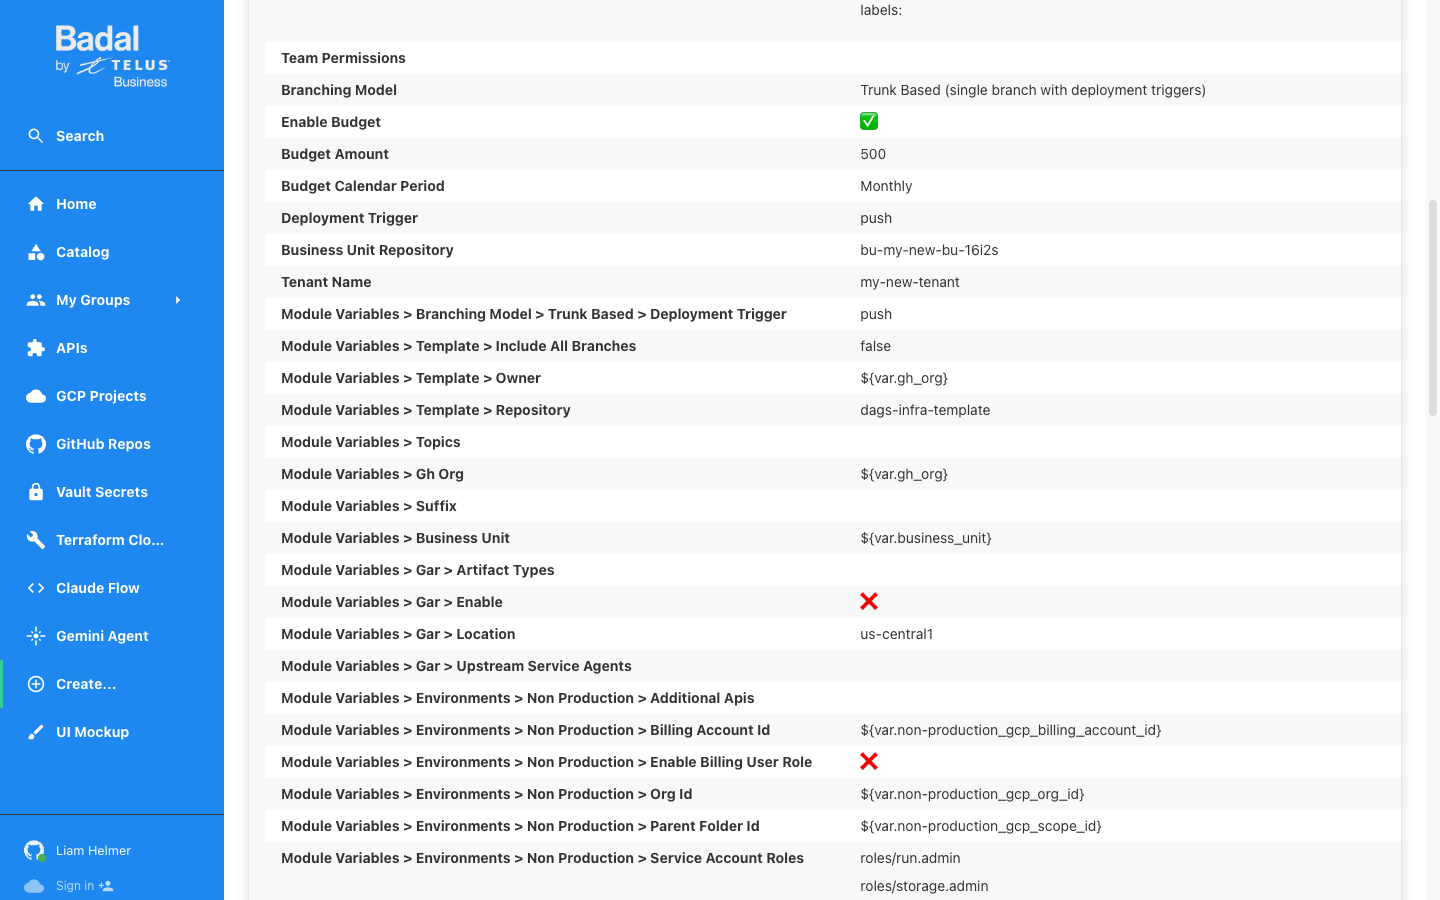
Budget Configuration
| Setting | Default | Description |
|---|---|---|
| Enable Budget | Checked | Create a billing budget for this tenant |
| Budget Amount | 500 | Budget amount in the billing account's currency |
| Budget Calendar Period | Monthly | Billing period for the budget |
Deployment Trigger
| Trigger | Description |
|---|---|
| Push (default) | Deploy on every push to the default branch |
| Release | Deploy only when a release is created |
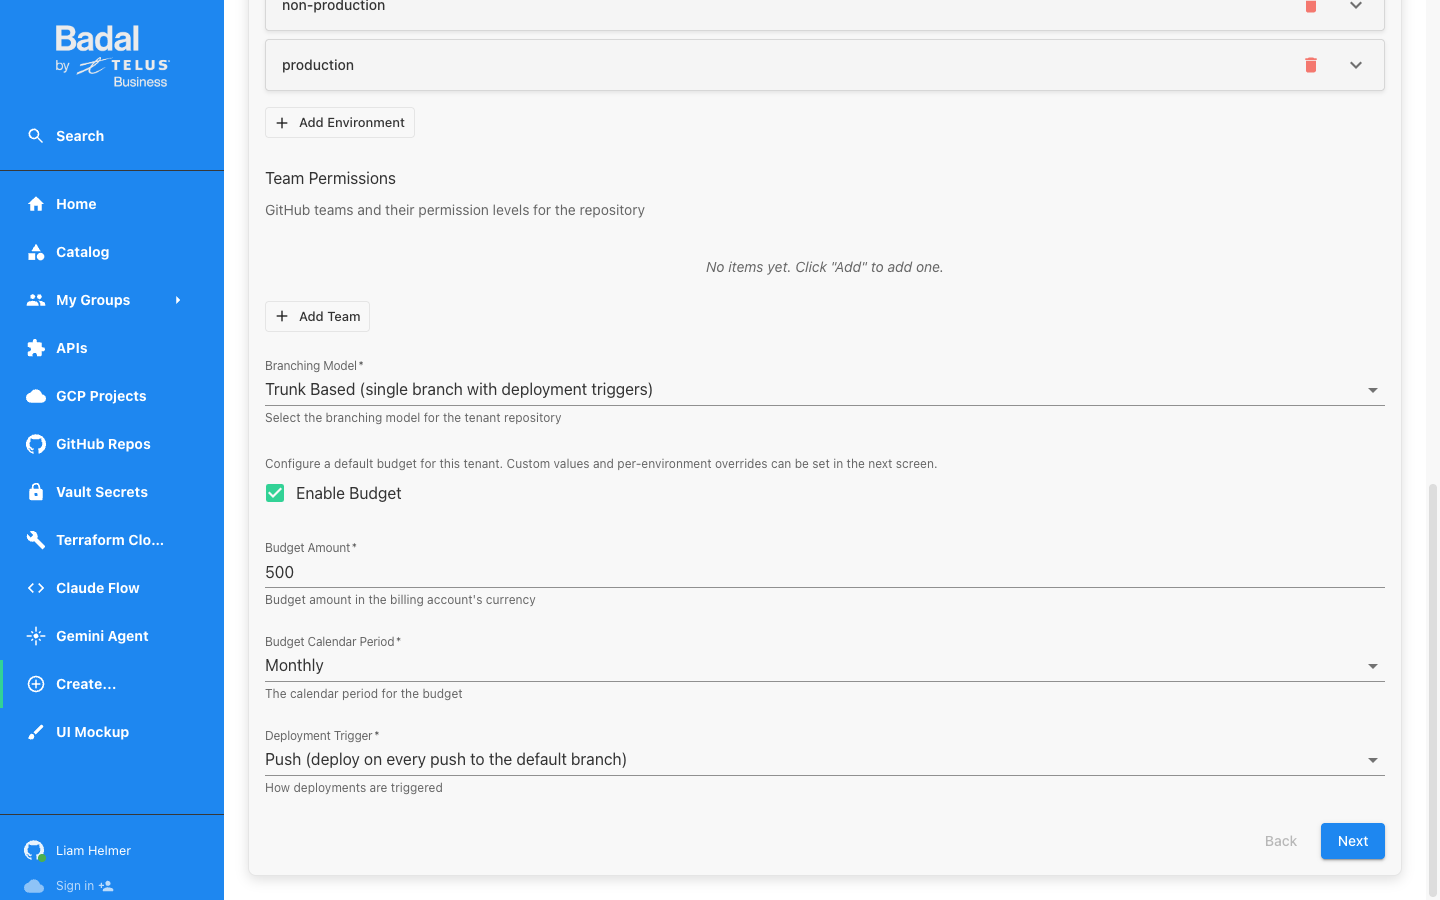
Click Next to proceed to module configuration.
Step 3: Edit Module Configuration
Step 2 presents the Terraform module variable editor, a powerful GUI for customizing the generated Terraform configuration.
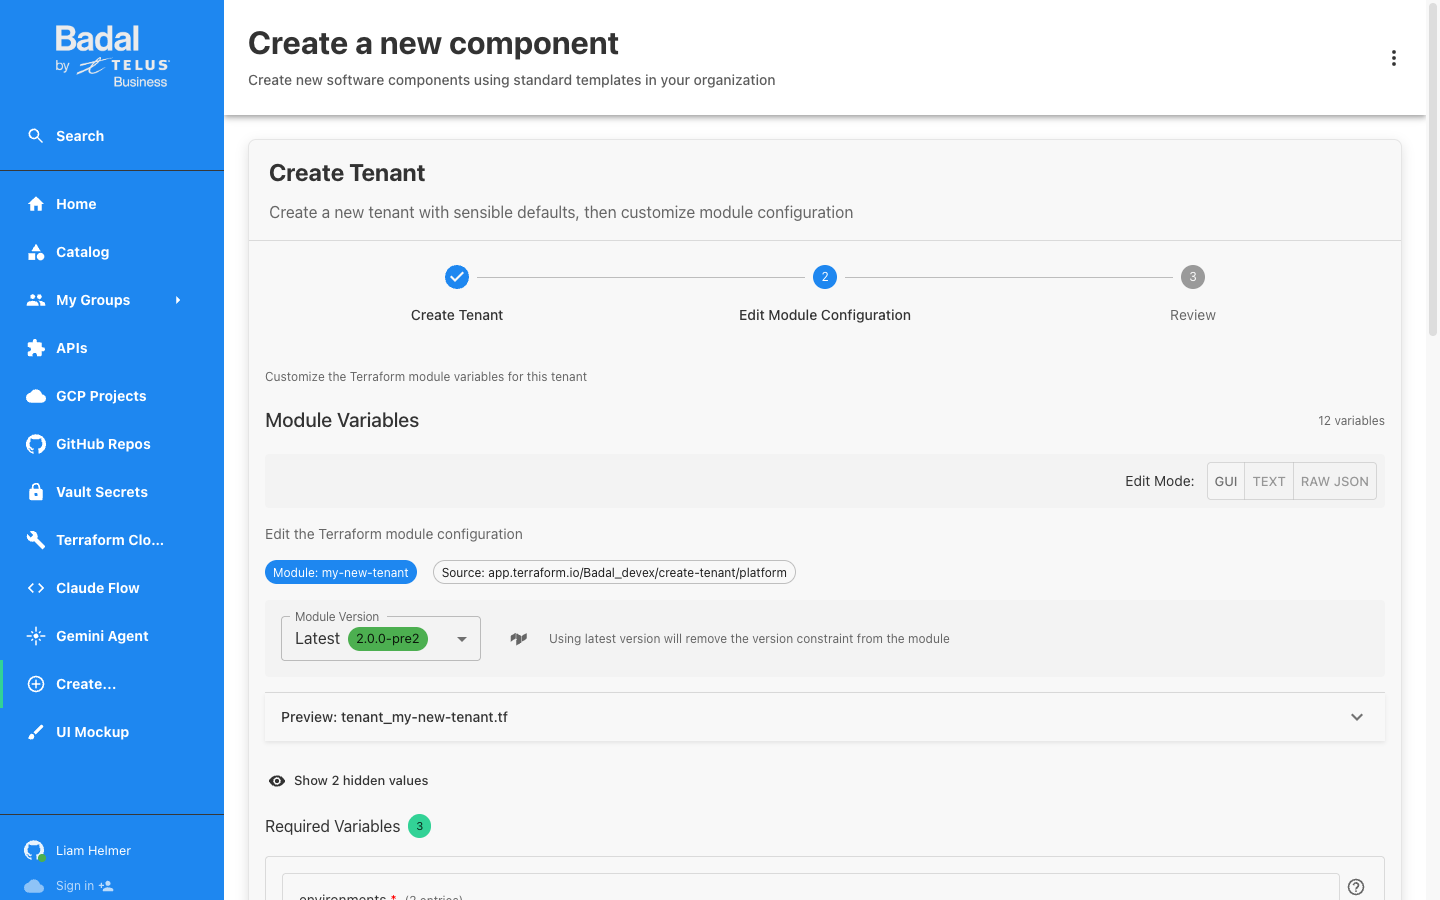
Module Information
| Property | Value |
|---|---|
| Module Name | my-new-tenant |
| Module Source | app.terraform.io/Badal_devex/create-tenant/platform |
| Module Version | Latest (2.0.0-pre2) |
| Output File | tenant_my-new-tenant.tf |
Edit Modes
The editor supports three modes:
| Mode | Description |
|---|---|
| GUI (default) | Visual form-based editor for each variable |
| TEXT | Plain-text YAML/JSON editor |
| RAW JSON | Direct JSON editing of the module configuration |
Required Variables
The module has 3 required variables, pre-populated from Step 1:
| Variable | Description | Pre-populated Value |
|---|---|---|
| environments | Map of environments to GCP project configuration | non-production, production (with org IDs, billing, folder IDs, service account roles) |
| name | Tenant name (without business unit prefix) | my-new-tenant |
| tfc | Terraform Cloud configuration (org ID, app OAuth IDs, share state) | Auto-configured |
Each environment entry includes:
billing_account_id-- Billing account for the projectorg_id-- GCP organization IDparent_folder_id-- Parent folder in the environment hierarchyservice_account_roles-- IAM roles for the tenant service account (default:roles/run.admin,roles/storage.admin)enable_billing_user_role-- Whether to grant billing user roleadditional_apis-- Extra GCP APIs to enablelabels-- Resource labels
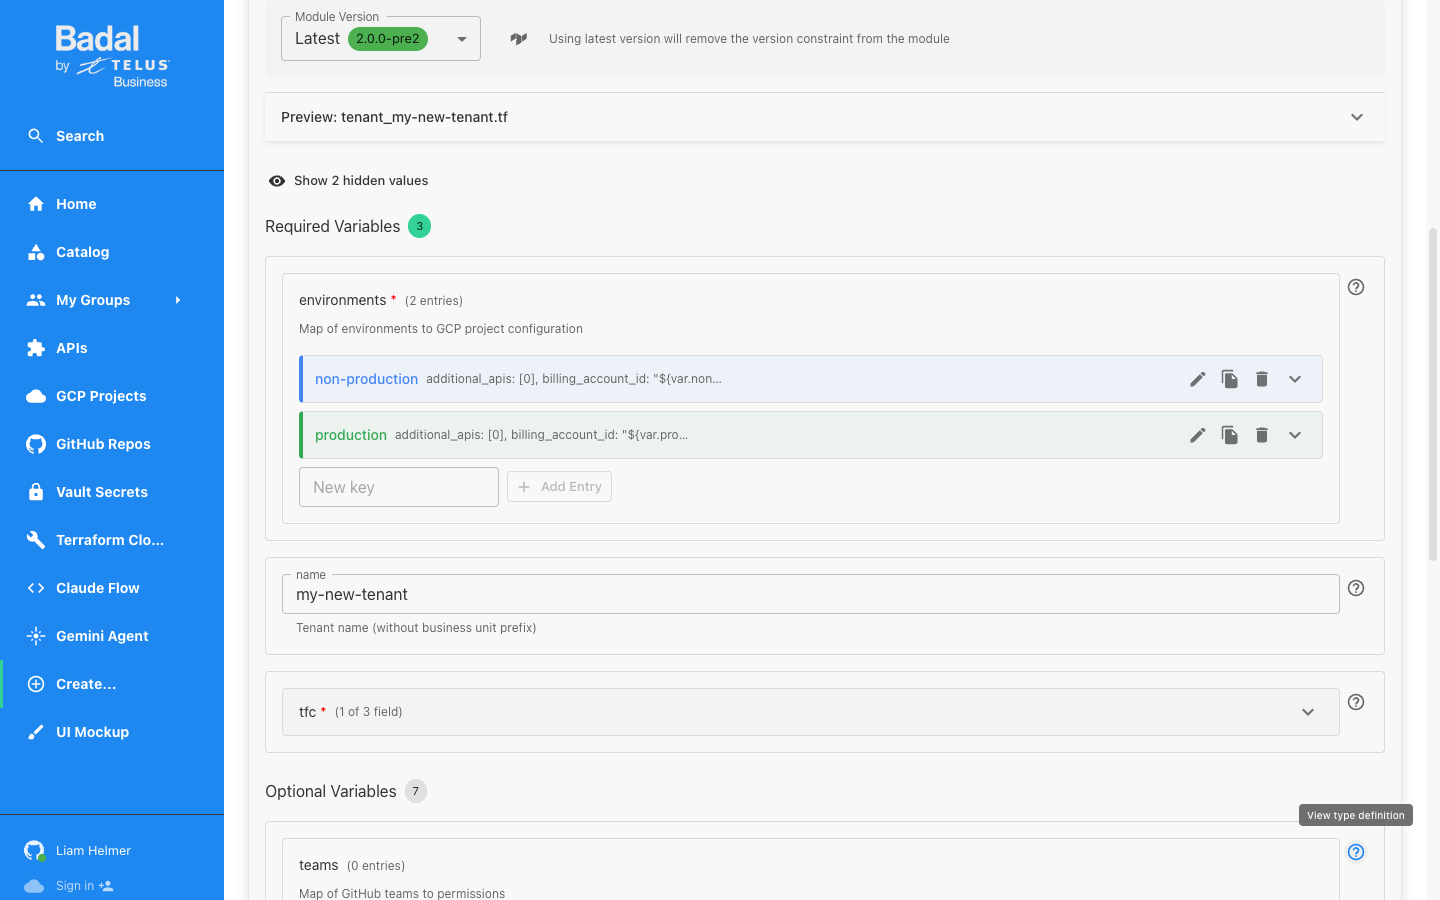
Optional Variables
The module has 7 optional variables that can be customized:
| Variable | Description | Default |
|---|---|---|
| teams | Map of GitHub teams to repository permissions | Empty |
| branching_model | Repository branching strategy configuration | Trunk Based |
| template | Template repository configuration (owner, repo, include branches) | dags-infra-template |
| topics | Additional GitHub repository topics | Empty (merged with default tenant topics) |
| suffix | Custom suffix for resource naming | null (auto-generated) |
| gar | Google Artifact Registry configuration (enable, location, artifact types) | Disabled |
| budget | Budget configuration (amount, calendar period) | From Step 1 settings |
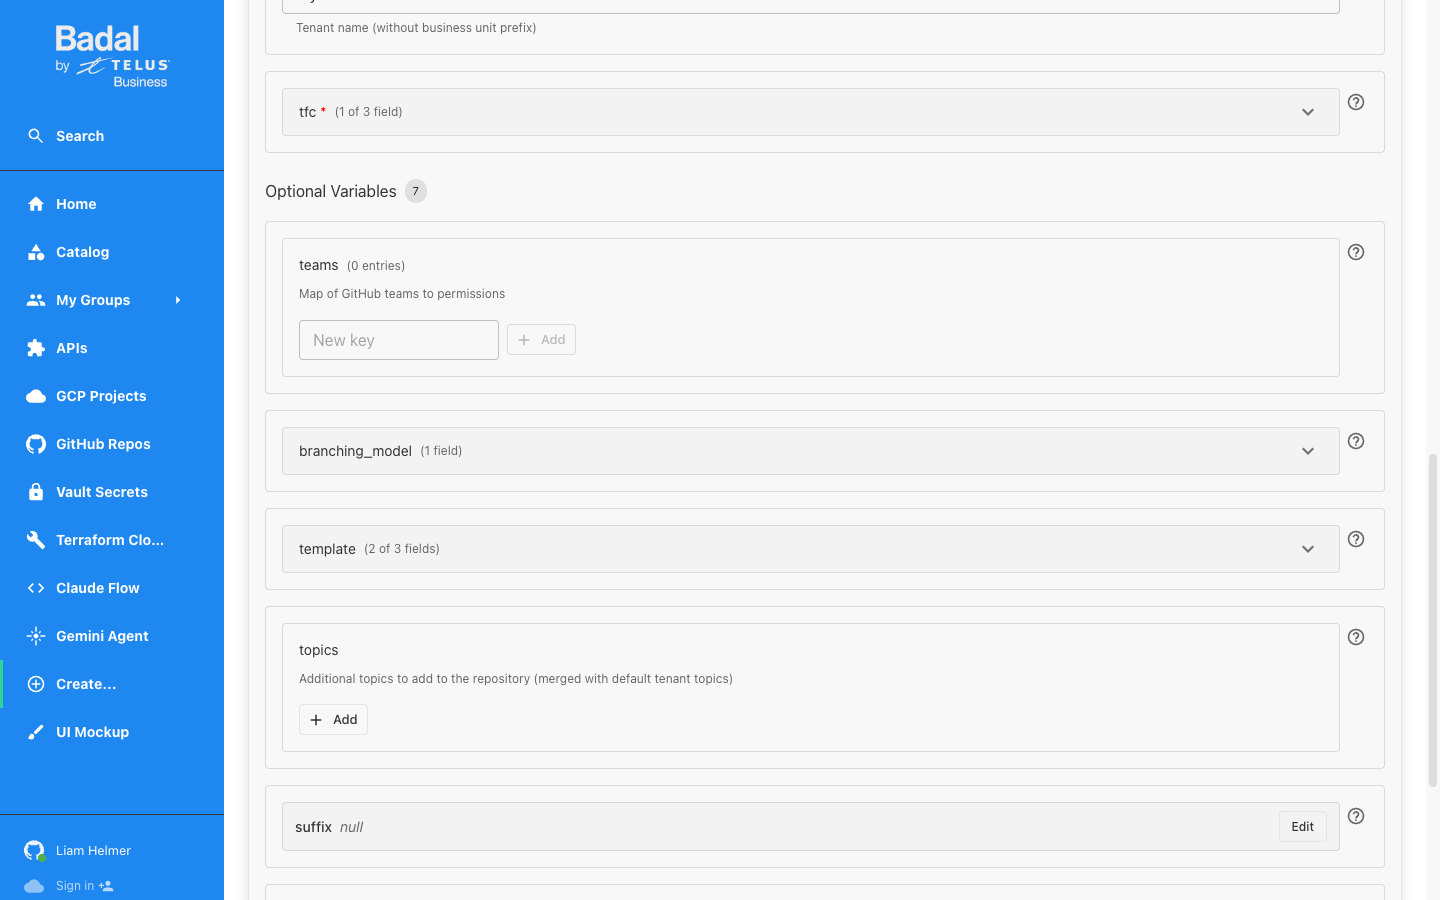
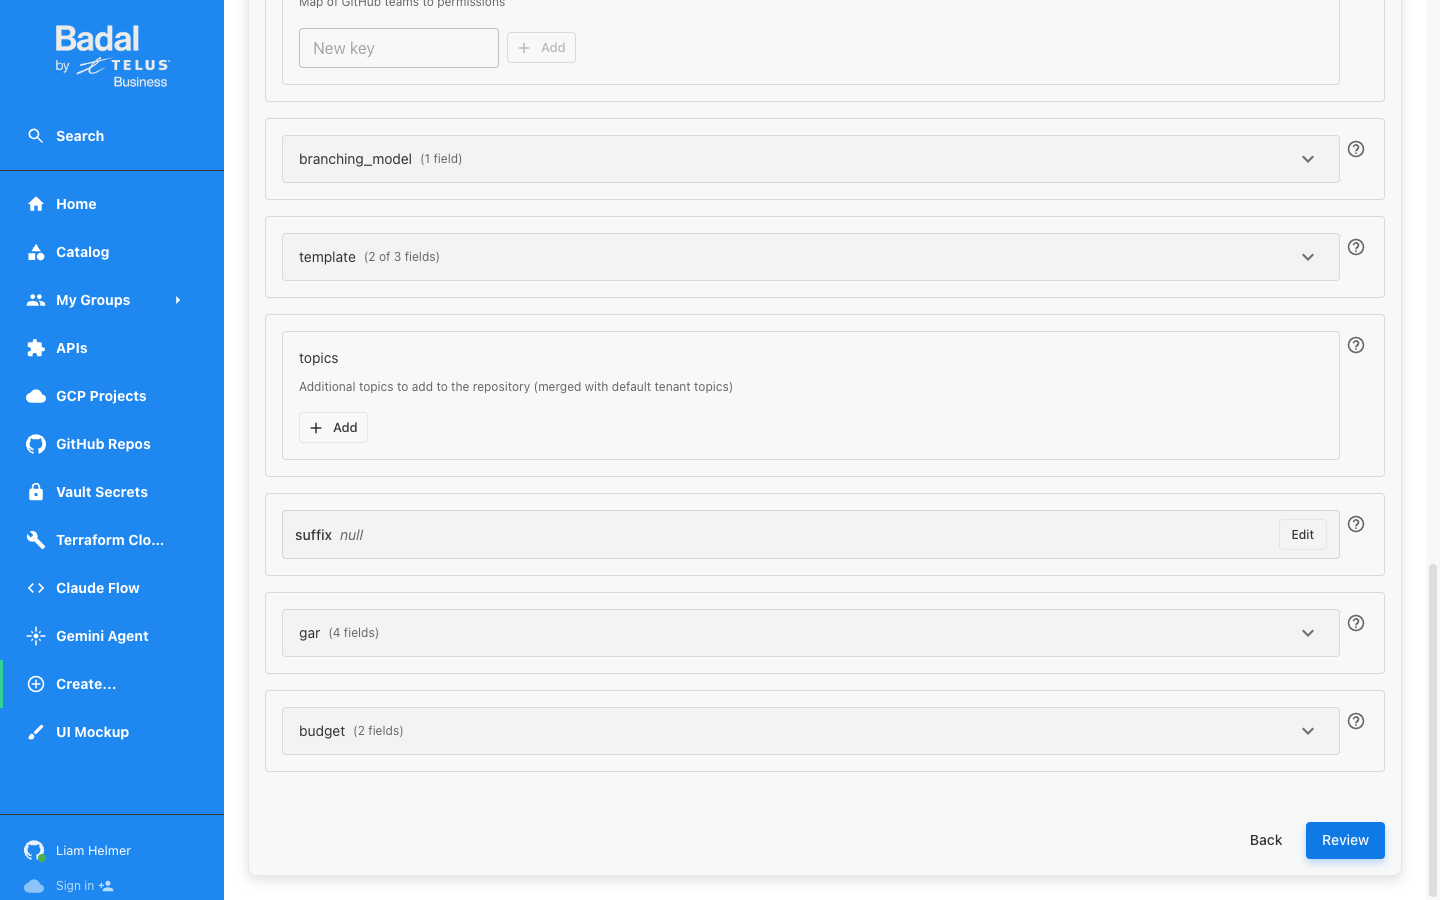
Click Review to proceed to the final step.
Step 4: Review and Create
The review step displays a comprehensive summary of all configuration, including:
- Step 1 values (BU repository, tenant name, environments, branching model, budget)
- All module variables (required and optional) with their resolved values
- The rendered Terraform content showing the exact HCL that will be committed
The rendered content preview shows the complete module "my-new-tenant" block that will be written to terraform/tenants/tenant_my-new-tenant.tf in the business unit repository.
Click Create to submit.
Step 5: Scaffolder Execution
After clicking Create, Backstage runs five automated steps:
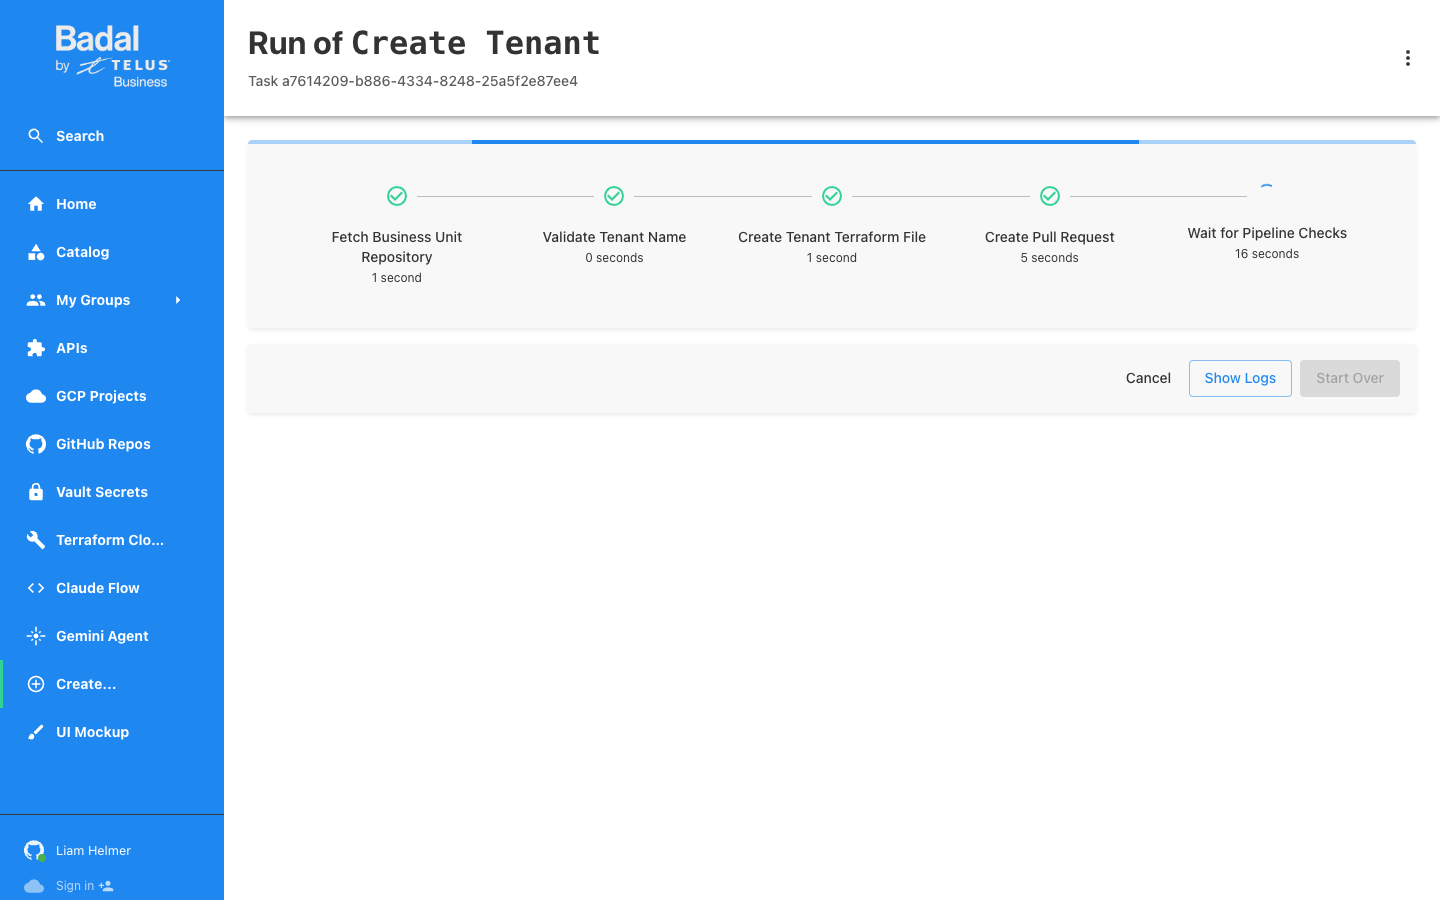
Step Breakdown
| Step | Name | Duration | Description |
|---|---|---|---|
| 1 | Fetch Business Unit Repository | ~1 second | Retrieves the BU repository metadata |
| 2 | Validate Tenant Name | ~0 seconds | Checks tenant name uniqueness and format |
| 3 | Create Tenant Terraform File | ~1 second | Generates the Terraform module file |
| 4 | Create Pull Request | ~5 seconds | Opens a PR in the business unit repository |
| 5 | Wait for Pipeline Checks | ~30+ seconds | Polls for CI/CD check completion |
During step 5, Backstage polls the GitHub API every 30 seconds to check the status of the Terraform Cloud plan check. The logs display each polling attempt with the check status.
Step 6: Review the PR on GitHub
The PR is created in the business unit repository by the backstage-local-testing-2[bot] app.
PR Details
| Property | Value |
|---|---|
| Repository | bu-my-new-bu-16i2s |
| Source branch | tenant/create-my-new-tenant |
| Target branch | main |
| Created by | backstage-local-testing-2[bot] |
| Files changed | 1 (terraform/tenants/tenant_my-new-tenant.tf) |
The PR description includes a Basic Configuration table summarizing all tenant parameters:
| Property | Value |
|---|---|
| Tenant Name | my-new-tenant |
| Branching Model | trunk_based |
| Deployment Trigger | push |
| Share State | true |
| Template Repository | dags-infra-template |
| Budget | 500 |
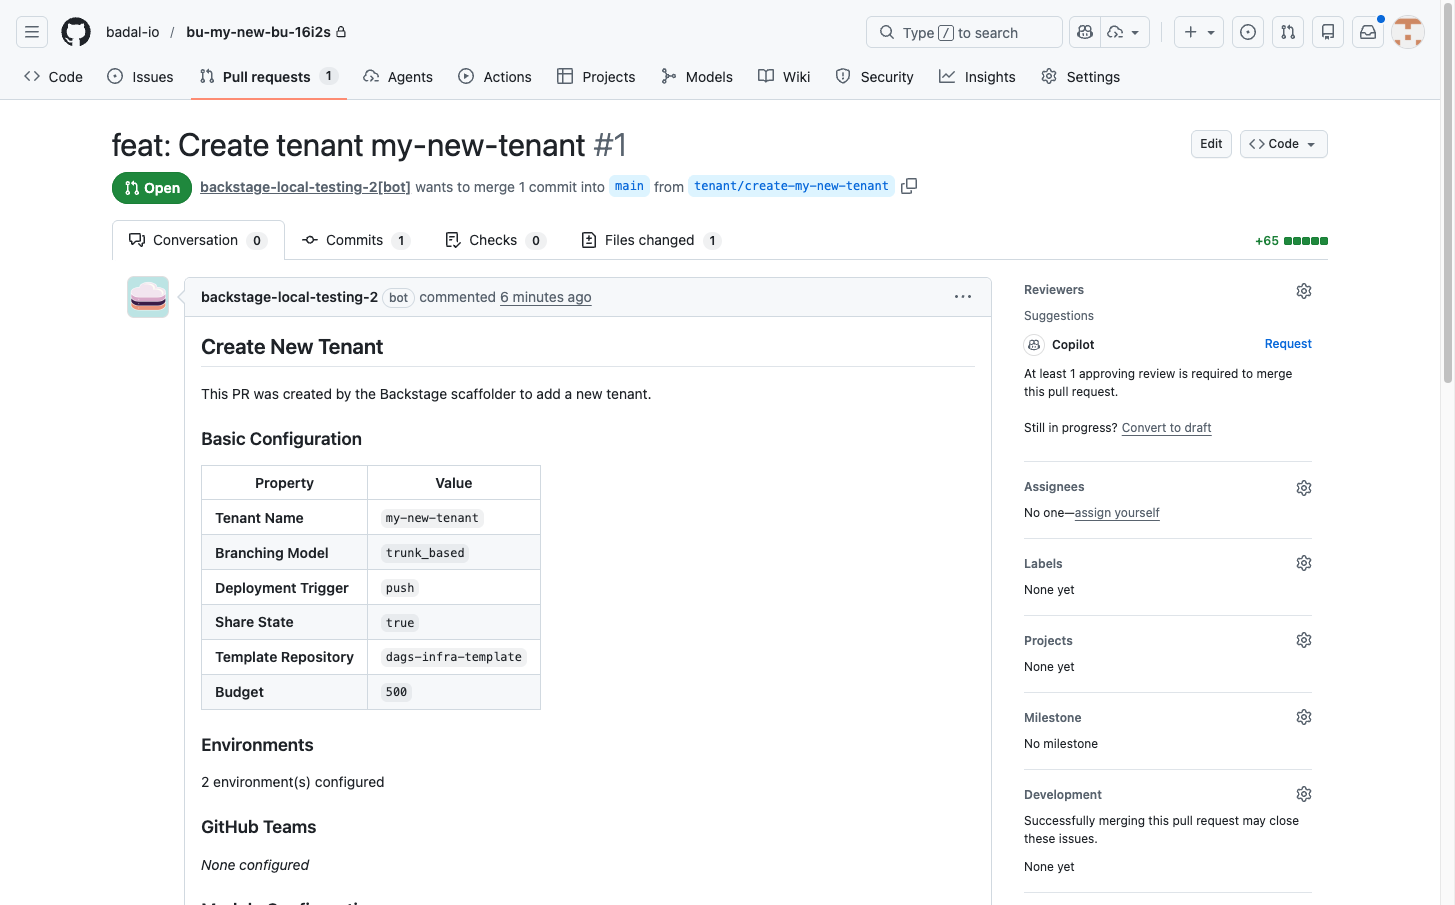
CI Checks
Terraform Cloud automatically runs a speculative plan on the PR. This validates the Terraform configuration and shows exactly what GCP resources will be created when the PR is merged.
Step 7: Approve, Merge, and Apply
The remaining steps follow the same pattern as the Business Unit creation walkthrough:
- Review the Terraform plan output posted by Terraform Cloud
- Approve the PR (requires at least 1 approving review)
- Merge the PR to trigger the apply
- Terraform Cloud applies the configuration automatically
What Gets Created
When the Terraform apply completes successfully, the following resources are provisioned:
GCP Projects
A tenant project is created in each configured environment:
| Environment | Project ID Pattern |
|---|---|
| non-production | my-new-tenant-np-{suffix} |
| production | my-new-tenant-p-{suffix} |
GitHub Repository
A new GitHub repository is created from the template:
| Property | Value |
|---|---|
| Repository | my-new-bu-my-new-tenant-{suffix} |
| Template | dags-infra-template |
| Organization | badal-io |
Service Accounts
Per-environment service accounts with the configured roles:
roles/run.admin-- Cloud Run administrationroles/storage.admin-- Cloud Storage administration
Billing Budget
A monthly budget of $500 is created and associated with the tenant's GCP projects.
Terraform Cloud Workspace
A Terraform Cloud workspace is created for managing the tenant's infrastructure, linked to the new GitHub repository.
The {suffix} in resource names is a unique 5-character alphanumeric identifier generated during creation to ensure global uniqueness across GCP. The same suffix is used across all environments for the same tenant.